Saturday, August 29, 2015

Whimsical Patchwork!

Something about summer makes me want to do fun whimsical manis... I had this Bundle Monster plate BM-607 with the patchwork design and wanted to use it for quite a while but I didn't get around to do it until now. 


I used the direct decal method so that I can make a colorful pattern. For tutorial of this method, check my previous post here


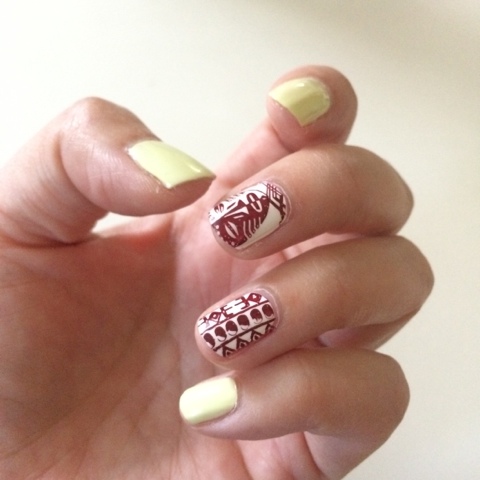
For this look, I first painted my nails with Essie Chillato (pale yellow). I used the patchwork design from Bundle Monster plate BM-607 and used the direct decal method. The colors I used to fill the designs are the following. Sally Hansen Ivory Skull (white), China Glaze Trip of a Lime Time (lime green), and China Glaze I Brake For Colour (pinkish red). Ceramic Glaze My Skinny Jeans (blue) was used for stamping outlines. 


My favorite polish this summer is definitely Essie Chillato. I have been using it so many times already!!! 


I really love this look! So fun and cute!! I have my nails quite short this time and I think the design like this suits short nails very well. 

Do you wear whimsical designs? 

Love,

Little Dot

Saturday, August 22, 2015

Pretty Flowers!

Here is the look I had recently and I really loved it!


For this look, I first painted my nails with China Glaze History of the World (smokey navy). I used direct decal method to stamp the flowers using Pueen plate 72. I used Mundo de Unas #12 and Essie Resort Fling for stamping color and filling in. 


After I did my nails, my beloved daughter wanted to do similar look!


Here is a group shot!


I love how the colorful flowers look on the dark navy background. 

Do you like bold floral look?

Love,

Little Dot

Saturday, August 15, 2015

Matchy Matchy!!

I got the inspiration from my lap top bag for this look!


Sometimes I get inspirations for my designs from all kinds of surrounding items. Purses and clothing items are often used for my ideas. I like matchy matchy sometimes...


For this look, first I painted my nails with Essie Urban Jungle (creamy white) and China Glaze Pinking Out the Windows (carnation pink). I used rose designs from Pueen plate 64, using Essie Fierce, No Fear (brown) as stamping polish. I also used the direct decal method and used China Glaze Pinking Out the Windows to color in the roses. 


If you like to see the tutorial for the direct decal method, check my previous post here


I think I did pretty good to match my computer bag!

Do you like matchy matchy??

Love,

Little Dot

Saturday, August 8, 2015

Tribal in Summer!

I went to an International Food Festival a few weeks ago with my beloved children. They had quite a collection of food around the world. We had some Nicaraguan dish among others and it was delicious! I love ethnic food!!


Here is the design I had for the occasion. Fun tribal look for the summer!

For this look, I first painted my nails with Essie Chillato (pale yellow) and Sally Hansen Ivory Skull (white). I used designs from MoYou London plate, Explorer collection 23, using Essie Shearling Darling (oxblood) as stamping polish. 


I haven't used this plate before, so I'm glad I had the opportunity to use it! 


We are having fun summer outings! What are the events and festivals are you enjoying this summer?

Love,

Little Dot

Saturday, August 1, 2015

Nail Stamping Tips & Tutorials 3 - Direct Decal Method

This is a different way of making decals and it has been around for a while. Other people call it as reverse stamping or advance stamping. To me, these names didn't stick, so I call it the direct decal method. No matter what you call it, I find this method to be a lot easier and faster compared to the traditional decal making.


Instruction

1. Paint your nails with the base color. 


2. Stamp a design on a stamper as usual. You can use a tape to take off any unwanted area from the stamper. Let it dry for a bit. 


3. Using a dotting tool or a brush, color in the design. You might want to wait for a bit to add different color to avoid mixing of colors. 


4. Let the design dry to the touch. 


5. Stamp the decal directly on the nail. You want to put a bit more pressure to make sure it sticks and gently lift the stamper off.


6. Pat down any area if lifting. And clean off with an acetone-dipped brush. 


7. Put a coat of top coat to seal the design. And you are done!


Tips

1. If you have multiple stamper heads, you can make several decals at the same time to save time. And make sure you use squishy stamper heads!

2. Be patient! The design has to be fairly dry before stamping on nails or it can smudge. (It happens to me sometime because I'm impatient!!)

3. Be careful when you color in the design. You can accidentally lift the outlines from the design. It is better to put rather generous amount of polish on dotting tool or brush so that not to disturb the outlines much. 


There you have it! I hope you give it a try if you haven't yet!

Love,

Little Dot